Primitives-Assemble
This section briefly describes the process undertaken to produce an animation. from the initial stage of pre-production and planning to the end result. The animation is showcasing a self-assembling robot and attempts to produce realistic and meaningful motions throughout, using animation principles and animation tools.
-
Pre-production and planning: Using sketches at the very beginning was a powerful way of narrowing down the ideas for the character to be used. It helped forge the idea of the character, the body parts required, the motion those body parts would provide and bring the character to life. One of the sketches is shown in Figure 1.
In addition to sketches, scripts were created in order to describe the motion that I had in mind and try to set up a basic structure for the work.

Figure 1: Sketch 1 -
Challenges and Highlights: In the process of creating an immersive animation, a number of different techniques and animation processes were used. Examples include Set-driven keys, Post-infinity curves, Graph editor manipulation, Constraints, Disney's Animation Principles, and Camera Motion smoothing.
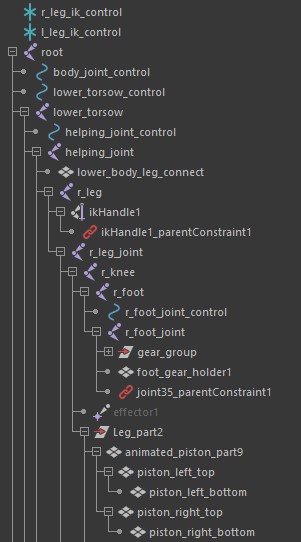
Set driven keys were used to extend and contract the robots extension parts shown in Figure 2.
Post-infinity curves were used to animate the gears of the robot's "heart" for non-stop motion.
Constraints added to separate body parts, so that they follow the motion of others such as the hand following the extension of the other body parts without breaking, shown in Figure 4.
Using Disney's animation principle to add anticipation when legs and arms contract in the animation, they first extend showing the something will happen, and when they contract they do in a spring-like manner. In Figure 3, anticipation is demonstrated by the initial rise of the graph, and then the spring dampening effect is shown in the oscillations close to the end.

Figure 2: 
Figure 3: Anticipation and spring-like motion effect. 
Figure 4: Constraints on hand, to follow motion of other body parts.